
Show Off Lighting trade show lights diagrams & instructions
If you are looking for THE BEST LED trade show lighting you just found it!! Fast setup, durable and bright LED trade show lights that will WOW your customers. So many of our customers say they have experienced a SUBSTANTIAL sales increase with Show Off Lighting. Please review our quick setup instructions for Show Off Lighting LED trade show lights.
FOR A BETTER CUSTOMER EXPERIENCE WE ARE NO LONGER USING THIS FORMER SITE. PLEASE CLICK ON THE IMAGE BELOW TO PLACE ALL ORDERS ON OUR NEW SHOPIFY WEBSITE

TRADE SHOW LIGHTING SETUP INSTRUCTIONS FOR
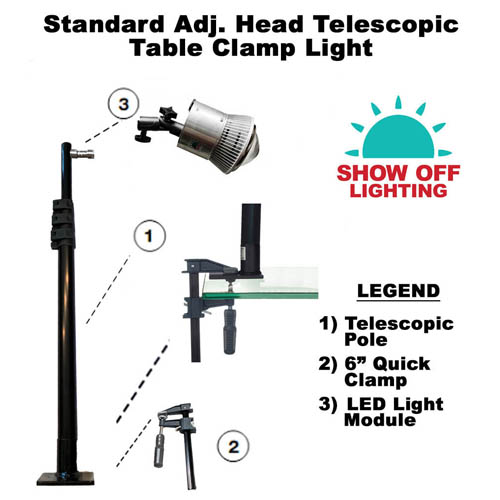
STANDARD ADJUSTABLE HEAD TABLE CLAMP LIGHTS
1) Rest base plate on top edge of table. Align base plate straight with the table edge.
2) Place top jaw of clamp on “center” of base plate, directly in front of the pole.
3) Squeeze bottom jaw of the clamp tight against bottom of the table, while holding it with your left hand. With your right hand turn the twist handle of the clamp counter clockwise until securely tightened.
4) Attach LED light module to standard head or extended head and tighten thumb screws while adjusting the LED light module in desired position. Make sure thumb screws are firmly tightened before going any further.
5) Slide LED light module assembly onto telescopic pole & make sure it is all the way attached.
6) Attach 6ft power cord to light. Give it a twist around the telescopic pole and use velcro straps to keep power cord neat against the pole.
7) Open top latch on telescopic pole & fully extend. Close the latch to lock in place. Open second latch on telescopic pole & fully extend. Close to lock in place. Open third latch on telescopic pole & fully extend. Close to lock in place.
8) ALL SHOW OFF LIGHTING TRADE SHOW LIGHTING IS MADE FOR COVERED TENT OR INDOOR USE ONLY
TRADE SHOW LIGHTING SETUP INSTRUCTIONS FOR
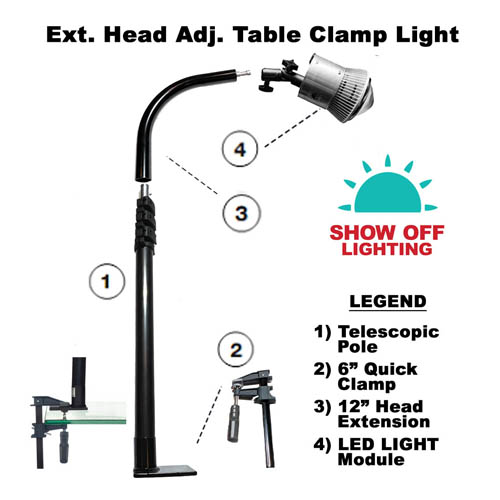
EXTENDED ADJUSTABLE HEAD TABLE CLAMP LIGHTS
1) Rest base plate on top edge of table. Align base plate straight with the table edge.
2) Place top jaw of clamp on “center” of base plate, directly in front of the pole.
3) Squeeze bottom jaw of the clamp tight against bottom of the table, while holding it with your left hand. With your right hand turn the twist handle of the clamp counter clockwise until securely tightened.
4) Attach LED light module to standard head or extended head and tighten thumb screws while adjusting the LED light module in desired position. Make sure thumb screws are firmly tightened before going any further.
5) Slide head & bulb assembly onto telescopic pole & make sure it is all the way attached.
6) Attach 6ft power cord to light. Give it a twist around the telescopic pole and use velcro straps to keep power cord neat against the pole.
7) Open top latch on telescopic pole & fully extend. Close the latch to lock in place. Open second latch on telescopic pole & fully extend. Close to lock in place. Open third latch on telescopic pole & fully extend. Close to lock in place.
8) ALL SHOW OFF LIGHTING TRADE SHOW LIGHTING IS MADE FOR COVERED TENT OR INDOOR USE ONLY
LED TRADE SHOW LIGHTING SETUP INSTRUCTIONS FOR
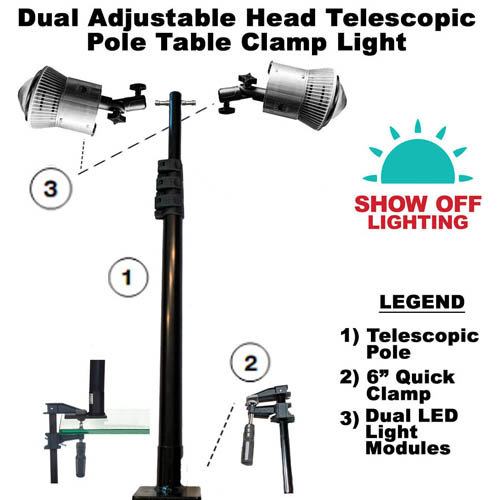
DUAL ADJUSTABLE HEAD TABLE CLAMP LIGHTS
1) Rest base plate on top edge of table. Align base plate straight with table edge.
2) Place top jaw of the clamp on the “center” of the base plate, directly in front of the pole.
3) Squeeze bottom jaw of clamp tight against bottom of table, while holding it with your left hand. With your right hand turn the twist handle of the clamp counter clockwise until securely tightened.
4) Attach LED light module to peg on the assembly & tighten thumb screws while adjusting the LED light module in the desired position. Make sure the thumb screws are firmly tightened before going any further. Repeat for the second module and adjust the lights to the desired position.
5) Attach Y power cord adapter to LED light modules & hold in place with provided velcro strap.
6) Attach 6ft power cord. Give it a twist around the telescopic pole & use velcro straps to keep the power cord neat again pole.
7) Open top latch of telescopic pole, fully extend & close to lock in place. Open second latch of telescopic pole, fully extend & close to lock in place. Open third latch of telescopic pole, fully extend & close to lock in place.
8) ALL SHOW OFF LIGHTING TRADE SHOW LIGHTING IS MADE FOR COVERED TENT OR INDOOR USE ONLY
LED TRADE SHOW LIGHTING SETUP INSTRUCTIONS FOR
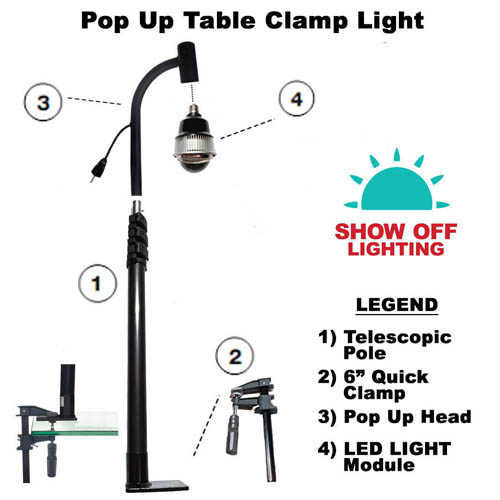
POP UP TABLE CLAMP LIGHTS
1) Rest the base plate of the telescopic pole on the top edge of the table. Align the base plate straight with the table edge.
2) Place the top jaw of the quick clamp on the “center” of the base plate, directly in front of the pole.
3) Squeeze the bottom jaw of the quick clamp tight against the bottom of the table, while holding it with your left hand. With your right hand turn the twist handle of the clamp counter clockwise until securely tightened.
4) Slide (but do not twist or force) the Pop Up head on to the telescopic pole.
5) Hold one hand under LED light module and screw it into the E27 socket inside the Pop Up head. Rotate counter clockwise until the LED light module is secure in the socket. DO NOT OVER TIGHTEN OR CROSS THREAD THE LED LIGHT MODULE.
6) Attach an extension cord to the light and it will come on.
7) ALL SHOW OFF LIGHTING TRADE SHOW LIGHTING IS MADE FOR COVERED TENT OR INDOOR USE ONLY
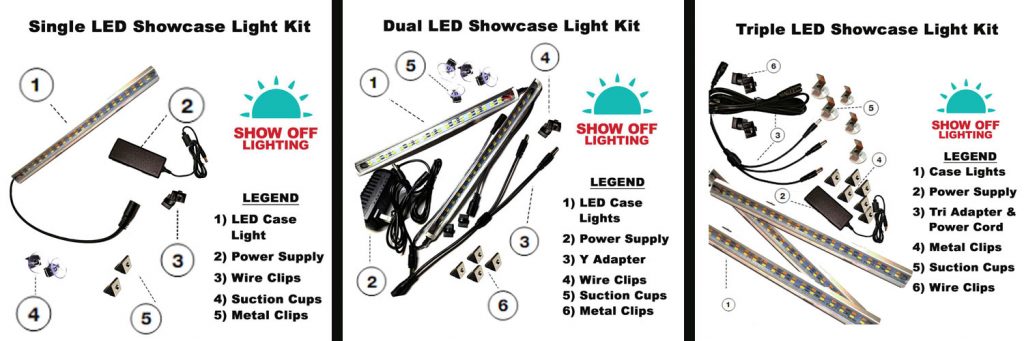
LED TRADE SHOW LIGHTING SETUP INSTRUCTIONS FOR
INTERIOR SHOWCASE LIGHTS
APPLY SUCTION CUPS TO CLEAN GLASS
1) Install the suction cups by hooking one end over the edge of the bar and press the other end over the opposite edge until you feel it snap in place. Suction cups should be set about 1 to 2 inches from either end of the light.
2) Plug the 5ft extension cord into the pigtail end attached to the light. If you have the dual or triple kit use the y adapter or tri adapter here.
3) Plug the power supply into the other end of the 5ft extension cord.
4) Attach the interior showcase light to the inside, top front edge, of the showcase by pressing the suction cups tightly against the glass. You can also attach it to the interior front or interior top of the showcase whichever you like best.
5) Feed the cable through your showcase door and plug the power supply unit into a power outlet. Your lighting will come on automatically once plugged into the power outlet.
6) ALL SHOW OFF LIGHTING TRADE SHOW LIGHTING IS MADE FOR COVERED TENT OR INDOOR USE ONLY
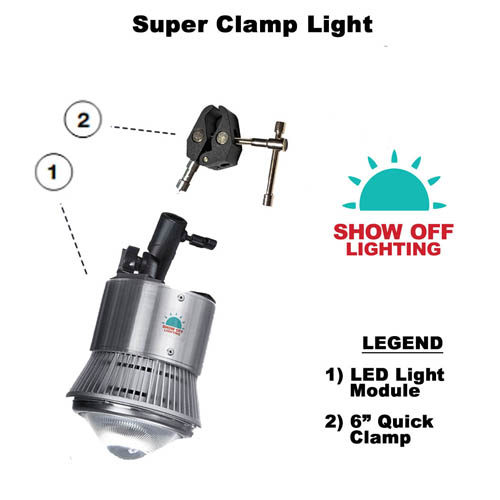
LED TRADE SHOW LIGHTING SETUP INSTRUCTIONS FOR
SUPER CLAMP TRADE SHOW LIGHT AND SUPER CLAMP TRADE SHOW TENT LIGHTS
1) Slide clamp into the neck of the LED light module and finger tighten the thumb screw.
2) Open the clamp to its widest point and clamp onto the pipe and drape pole above your display or tent frame. Tighten the clamp to the pole securely to prevent it from falling. Do not use pliers or tools to tighten as damage may result.
3) Adjust the super clamp trade show lighting to the desired angle and tighten the round black clamp knob securely with your hand using no tools.
4) Plug in the master power cord to the first light and daisy chain to the second light and repeat setup for up to (6) lights maximum.
5) ALL SHOW OFF LIGHTING TRADE SHOW LIGHTING IS MADE FOR COVERED TENT OR INDOOR USE ONLY
DAISY CHAIN UP TO (6) SUPER CLAMP TRADE SHOW LIGHTS MAXIMUM.
Please do not hang banners (or anything else that would block airflow) within 4 inches of this light, it will disrupt the airflow to the fan and cause the LED chip to overheat.
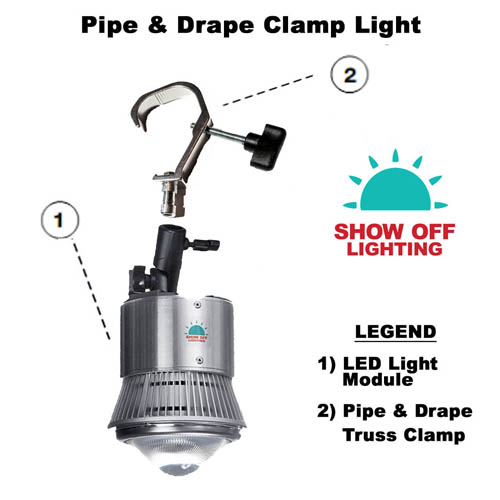
LED TRADE SHOW LIGHTING SETUP INSTRUCTIONS FOR
PIPE AND DRAPE CLAMP LIGHTS
1) Slide clamp into the neck of the LED light module and finger tighten the thumb screw.
2) Open the clamp to its widest point and clamp onto the pipe and drape pole above your display or tent frame. Tighten the clamp to the pole securely to prevent it from falling. Do not use pliers or tools to tighten as damage may result.
3) Adjust the pipe & drape trade show lighting to the desired angle and tighten the round black clamp knob securely with your hand using no tools.
4) Plug in the master power cord to the first light and daisy chain to the second light and repeat setup for up to (6) lights maximum.
5) ALL SHOW OFF LIGHTING TRADE SHOW LIGHTING IS MADE FOR COVERED TENT OR INDOOR USE ONLY
DAISY CHAIN UP TO (6) PIPE & DRAPE TRADE SHOW LIGHTS MAXIMUM.
Please do not hang banners (or anything else that would block airflow) within 4 inches of this light, it will disrupt the airflow to the fan and cause the LED chip to overheat.
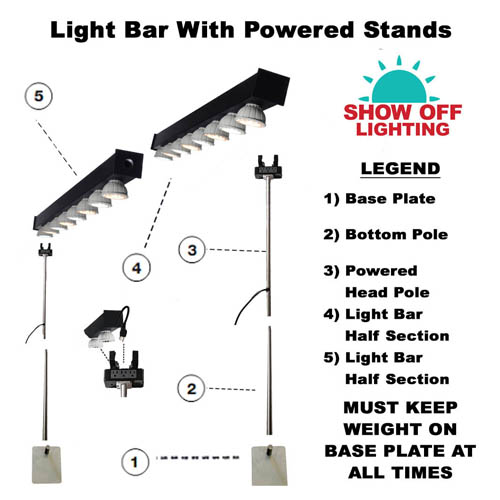
LED TRADE SHOW LIGHTING SETUP INSTRUCTIONS FOR
LED LIGHT BARS
1) TABLE MODEL: Put 1 corner of base plate 4” from front edge of booth & 4” from side. FLOOR MODEL: Place under your floor model display case.
2) TABLE MODEL: Put base plates every 6 to 8 ft depending on light length. Clamp to table or keep 1LB of weight on base plates to prevent from falling. FLOOR MODEL: Tuck base plate under your floor model display cases.
3) Slide (do not twist) support poles on to the base plate peg with power outlets facing the inside the booth & drape power cord over back of table.
4) Use optional stabilizer suction clips to secure poles to any glass surface for additional stability. This is best used with the floor stand models.
5) Slide 2 pieces of light bars together making sure not to twist or force together. Insert locking pin.
6) Seat both ends of the light bar securely in the clips on top of the heads. Align the power cord with outlet & plug into the outlets. If you need to locate a stand a foot from the end of the light you will need a 1ft. extension cord for plug to reach. Run power to the stands electrical cord & turn the lights on.
7) ALL SHOW OFF LIGHTING TRADE SHOW LIGHTING IS MADE FOR COVERED TENT OR INDOOR USE ONLY
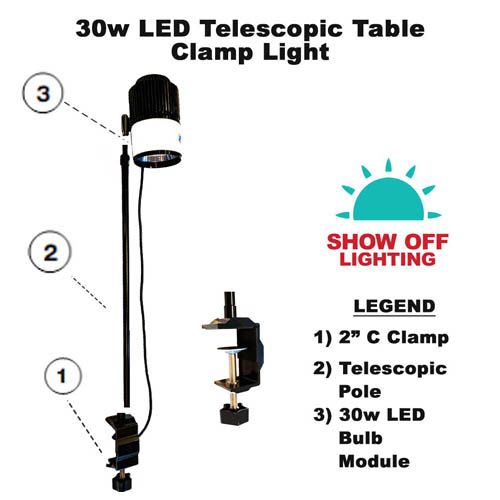
LED TRADE SHOW LIGHTING SETUP INSTRUCTIONS FOR
30W TABLE CLAMP LIGHTS
1) Decide if you want the clamp to mount horizontal or vertical and screw the pole into the appropriate hole on the clamp. Screw the telescopic pole into the clamp finger tight only. Please do not use tools. The clamp has (2) holes and one is for vertical mount and one is for horizontal mounting. Most vendors will use this light as a table clamp light.
2) Slide the clamp over the edge of the table. Finger tighten the clamp but do not use tools.
3) Loosen the lock knob in the center of the pole and loosen one turn. Extend the telescopic pole to 1 inch from fully extended. Tighten the lock knob. If you extend to more than 1 inch from fully extended you have extended it too far.
3) Give the power cord a wrap around the pole to keep the cord nice and neat.
4) Plug the light in and adjust the swivel head to the desired angle and you are done!!
5) ALL SHOW OFF LIGHTING TRADE SHOW LIGHTING IS MADE FOR COVERED TENT OR INDOOR USE ONLY
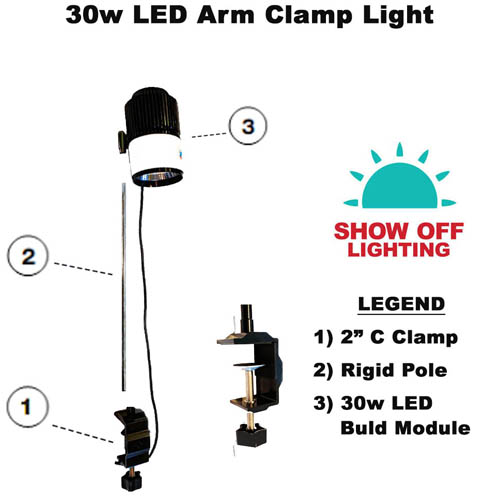
LED TRADE SHOW LIGHTING SETUP INSTRUCTIONS FOR
30W ARM CLAMP LIGHTS
1) Decide if you want the clamp to mount horizontal or vertical and screw the pole into the appropriate hole on the clamp. Screw in finger tight only. Please do not use tools. The clamp has (2) holes and one is for vertical mount and one is for horizontal mounting.
2) Slide the clamp over the edge of whatever you are attaching to. Finger tighten the clamp but do not use tools.
3) Give the power cord one wrap around the pole to keep the cord nice and neat.
4) Plug the light in and adjust the tilt, swivel head to the desired angle and you are done!!
5) ALL SHOW OFF LIGHTING TRADE SHOW LIGHTING IS MADE FOR COVERED TENT OR INDOOR USE ONLY
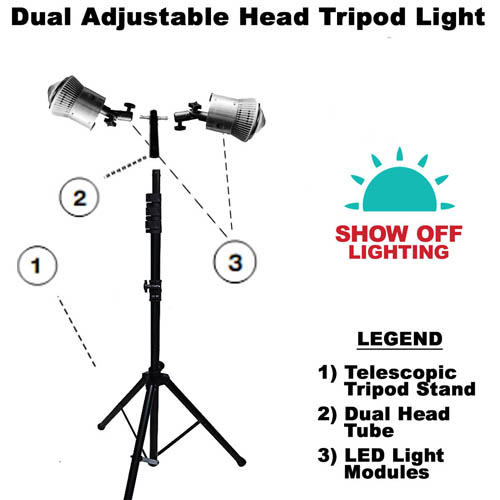
LED TRADE SHOW LIGHTING SETUP INSTRUCTIONS FOR
TRADE SHOW TENT LIGHTING
1) Turn the knob on the tripod base to open the tripod legs and tighten the knob to stabilize.
2) Slide (but do not twist or force) the LED light modules on the head and twist the knob to lock in the desired position.
3) Slide (but do not twist or force) the head with the attached light modules on the telescopic pole.
4) Plug each end of the Y adapter power cord in the back of each bulb and then plug the 15ft extension cord into the other end of the Y adapter and the light will come on. Use the velcro straps to keep the cords nice and neat against the pole.
5) Open top latch on the telescopic pole and fully extend. Close the latch to lock in place.
6) Open second latch on the telescopic pole and fully extend. Close to lock in place. Open third latch on the telescopic pole and fully extend. Close to lock in place. Stand back and look at your stunning trade show lighting. See how bright your trade show or craft show tent becomes with Show Off Lighting.
7) ALL SHOW OFF LIGHTING TRADE SHOW LIGHTING IS MADE FOR COVERED TENT OR INDOOR USE ONLY